Table of contents (13 sections)
- The 90-second version
- Why this matters if you run a Shopify store
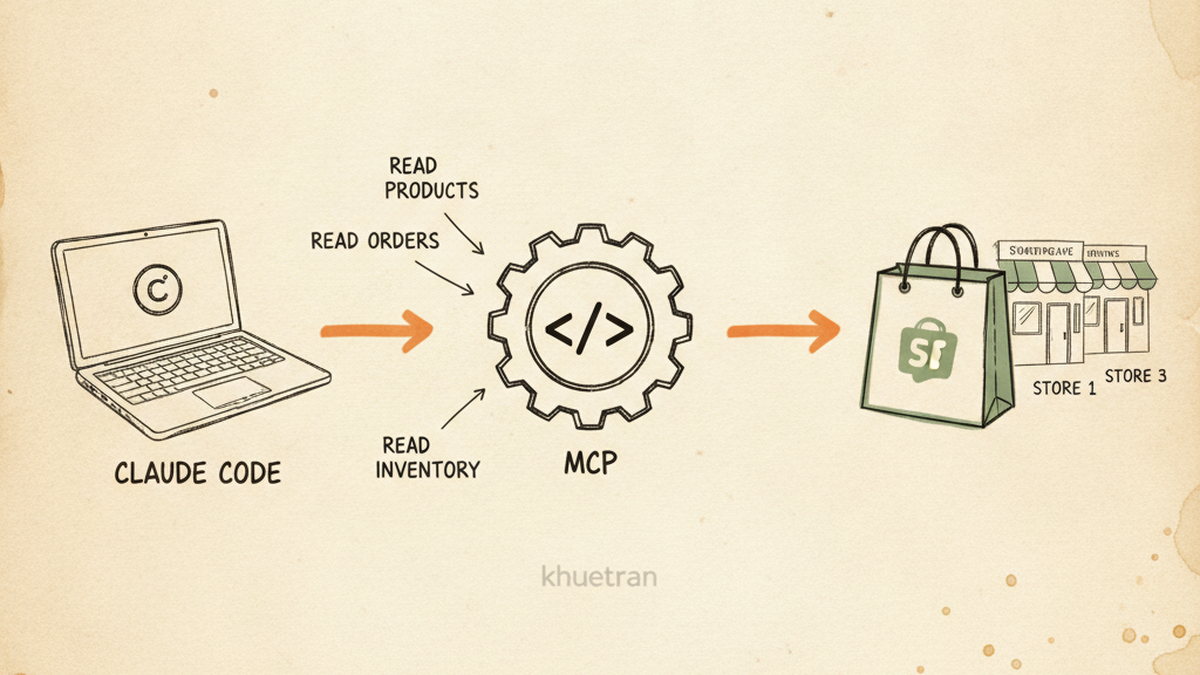
- What MCP actually is, in 60 seconds
- Heads-up: Shopify deprecated the “Develop apps” shortcut on January 1, 2026
- Three modern paths, pick the one that fits
- Verify it works with one prompt
- 5 prompts I run on my stores every week
- 5 errors I hit so you can skip them
- Bonus: schedule 5 ops routines with Claude Code Routines
- What you can’t do (honest limits)
- Who this is for, who it is not for
- FAQ
- I wire this up for operators
The 90-second version
- You can connect Claude to your Shopify store today in 5-30 minutes, depending on which of three paths fits you.
- The easiest path (Claude Desktop’s Shopify connector) needs zero code, zero terminal, zero token paste. You click Connect, authorize in Shopify, and the 25 Shopify tools light up inside Claude.
- If you run one store, the connector is the fastest path. I run several stores from Hanoi, so I use custom-app Admin tokens (Path C) instead, which skips the connector’s constant store-switching.
- Important: Shopify deprecated the old “Develop apps” custom app path on January 1, 2026 for new apps. Older tutorials that walk through it are now stale. This guide covers the three modern paths only.
- Below: three setup paths in a comparison table, 5 prompts I run weekly, 5 ops routines you can schedule with Anthropic’s new Routines feature (sales pulse, OOS watch, slow movers, ticket aging, refund anomalies), and 5 common errors so you skip them.
Updated July 2026 with how I actually connect across multiple stores, and why the built-in connector is not it.
Why this matters if you run a Shopify store
The promise of AI for ecom operators is straightforward: ask a question in plain English, get an answer that pulls real data from your store. “Which products lost stock this week?” “Show me orders over $200 from California in the last 30 days.” “Which collections have no description tag?”
Without MCP (Model Context Protocol), Claude can only guess. It does not see your store. You paste a CSV, it answers, you paste another CSV, it answers again. The loop is slow and the data is always stale.
With MCP, Claude reaches into your Shopify Admin API directly. You ask, it queries, it answers, all in one turn. No CSVs. No spreadsheets. No copy-paste between tabs.
The reason most operators have not done this yet is the perception that MCP is a developer thing. You read the spec, you see TypeScript, you bounce. I bounced too, twice. Then I realized you do not need to build an MCP server. You install one that already exists, and you wire it to your store with a token.
What MCP actually is, in 60 seconds
Think of MCP as a universal adapter between Claude and any system that has an API. Shopify has an API. Google Search Console has an API. Stripe has an API. Each one normally needs a custom integration. MCP standardizes the wiring so Claude can talk to all of them through one protocol.
An MCP server is a small program that translates between Claude’s protocol and a specific API. Someone wrote the Shopify MCP server. Someone wrote the GSC MCP server. You do not have to write either. You install them and tell them how to authenticate to your store.
That is the entire mental model. Once it clicks, the setup is almost boring.
Heads-up: Shopify deprecated the “Develop apps” shortcut on January 1, 2026
If you searched this topic 8 months ago, you would have hit a one-click path called “Settings → Apps and sales channels → Develop apps”. That path is now retired for new apps. Shopify’s official notice:
“As of January 1, 2026, you can no longer create new legacy custom apps. This does not impact any existing apps.” (Shopify Changelog)
If you already have a legacy custom app installed (a token starting with shpat_), it still works. Do not delete it; you cannot recreate it as legacy. If you are starting fresh today, pick one of the three modern paths below.
Three modern paths, pick the one that fits
All three end in the same place: Claude can read your store. They differ in how much setup time you accept up front.
| Path | Setup time | Code required | Best for |
|---|---|---|---|
| A. Claude Desktop connector (UI) | ~5 minutes | None | Solo operator on 1 store, wants chat UI, no terminal |
| B. Shopify AI Toolkit MCP (CLI) | ~15 minutes | One command | Operator using Claude Code, 1+ store, comfortable in terminal |
| C. Custom app + Admin token | ~30-60 minutes | Some (token setup) | Multi-store operators (no store-switching), agencies, scripted automation |
Here is what I actually run, and why. If you have one store, use Path A, the connector. It is the fastest and it is what I recommend to most operators I onboard. But I run several stores, and the built-in connector makes you switch the active store every time you change context. That got old fast. So across my stores I use Path C: one custom app per store, its Admin API token dropped into a local config, and Claude talks to whichever store I name, no switching. It also scripts cleanly for my daily checks. Path B (the CLI dev tools) is useful for inspecting the Admin GraphQL schema, but it is not how I run day-to-day store ops.
Path A: Claude Desktop connector (no code, ~5 minutes)
This is the path most operator clients pick, and it is the one Shopify and Anthropic both endorse for non-developers. Step by step:
- Install Claude Desktop if you do not already have it. You need a Claude.ai Pro, Max, Team, or Enterprise subscription.
- Open Claude Desktop. In the left sidebar, click Customize, then Connectors.
- Click the + icon at the top of the Connectors panel. A directory of available connectors opens.
- Find Shopify in the directory and click Connect.
- Claude redirects you to your Shopify admin to authorize the connection. Review the data access level Shopify shows. You can decline any scope you do not want.
- Approve. Shopify returns you to Claude. The Shopify connector now appears in your sidebar with 25 available tools (search products, get shop info, list orders, list customers, update product, and more).
That is the entire setup. No token to paste, no config file to edit, no CLI command to run. Test it by asking Claude: “Using Shopify, show me my 5 most recent orders.”
Reference: Shopify’s official guide + Claude Shopify connector page.
Path B: Shopify AI Toolkit MCP via Claude Code (~15 minutes)
If you live in a terminal and write prompts as part of your workflow, this path gives you scripted control. The Shopify AI Toolkit is an official Shopify package, open-sourced on April 9, 2026 under MIT license at github.com/Shopify/Shopify-AI-Toolkit.
Prerequisites:
- Claude Code installed (install guide). Quick check:
claude --versionshould print a number. - Node.js 18 or higher (
node --versionto confirm) - A Shopify Partner account, free at partners.shopify.com
Install the MCP server with one command:
claude mcp add --transport stdio shopify-dev-mcp -- npx -y @shopify/dev-mcp@latestThen authenticate to your store using the Shopify CLI:
shopify auth loginRestart Claude Code. The connector exposes 7 tools (search docs, validate GraphQL queries, execute store ops). Verify with: “Using shopify-dev-mcp, show me the GraphQL schema for the Order type.”
If you have multiple stores, repeat the steps with separate alias names like shopify-store-a, shopify-store-b. Reference: Shopify AI Toolkit docs.
Path C: Custom app + Admin token (this is what I actually use)
This is the path I run across my stores, so I will be specific. You create a custom app, get its Admin API access token, and put that token in a local config that Claude reads. With the token, Claude talks straight to that store’s Admin API and you never touch the connector’s store picker.
If your store is older and already has a legacy custom app (token starts with shpat_), just reuse that token. It still works, it never expires, and you cannot recreate a legacy app, so do not delete it. You are done; skip the rest of this section.
If it is a new store, legacy custom apps are gone (see the January 2026 note above), so you build it in the Dev Dashboard. Shopify made this more work than the old copy-paste: there is no “reveal token” button anymore. You get a Client ID and Secret, then run a one-time OAuth exchange that returns a permanent offline access token. Here is the exact flow I use.
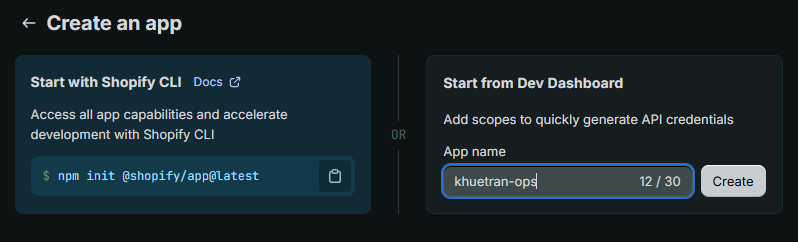
Step 1: Create the app
At dev.shopify.com, pick “Start from Dev Dashboard”, name the app, and click Create.
Step 2: Set the scopes and the redirect URL
In the app’s Access section, enter the Admin API scopes as a comma-separated list. My read-only set for store ops is read_products,read_orders,read_all_orders,read_inventory,read_locations,read_analytics,read_customers (add write_products only if you want Claude to make changes). Check Use legacy install flow, which is what enables the browser OAuth with a redirect. Then set Redirect URLs to the exact local address your script will listen on: http://localhost:3456/callback. If this does not match your script exactly, the browser step fails with no useful error. This is the single most common mistake. Release the version.
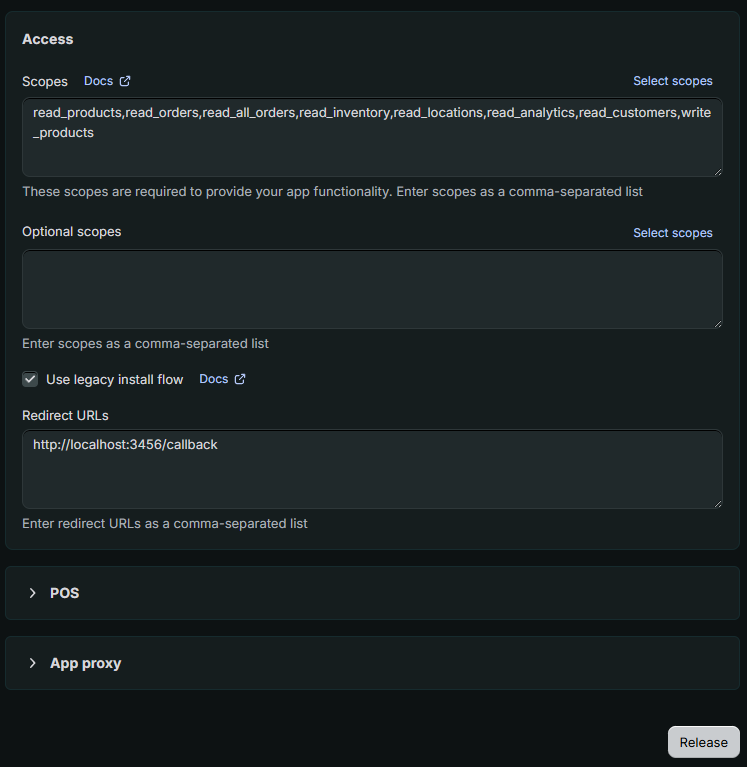
You can change scopes later by shipping a new version and re-approving. You do not have to rebuild the app.
Step 3: Copy the Client ID and Secret
Open the app’s Settings tab and copy the Client ID and Client secret. These are not the access token yet; they are what you exchange for one.
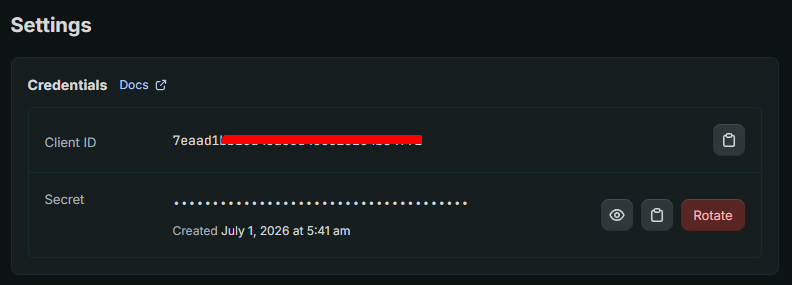
Step 4: Run a one-time OAuth script
This short script replaces the old copy-paste. It opens the browser, you approve once, and it exchanges the code for a permanent offline token. Python, standard library, nothing to install:
#!/usr/bin/env python3
"""
shopify_oauth_token.py - get a PERMANENT offline Admin API token for your OWN Shopify store.

One-time OAuth over localhost. Requires the custom app's Client ID + Client Secret
(Dev Dashboard -> your app -> Settings) and the redirect URL
http://localhost:3456/callback registered on the app (Access -> Redirect URLs).

Run:
  python shopify_oauth_token.py --shop your-store.myshopify.com --client-id XXX --client-secret YYY

The browser opens, you click Install/Approve once, and it prints an offline access token
(shpat_...) that DOES NOT expire. Paste that token into your .env.  Stdlib only, no pip installs.
"""
import argparse, http.server, secrets, urllib.parse, urllib.request, json, webbrowser, threading, sys

PORT = 3456
REDIRECT = f"http://localhost:{PORT}/callback"   # MUST match the Redirect URL registered on the app

def main():
    ap = argparse.ArgumentParser()
    ap.add_argument("--shop", required=True, help="your-store.myshopify.com")
    ap.add_argument("--client-id", required=True)
    ap.add_argument("--client-secret", required=True)
    ap.add_argument("--scopes",
                    default="read_products,read_orders,read_all_orders,read_inventory,"
                            "read_locations,read_analytics,read_customers")
    a = ap.parse_args()
    shop = a.shop.replace("https://", "").replace("http://", "").strip("/")
    state = secrets.token_urlsafe(16)
    holder = {}

    # No grant_options[]=per-user  => OFFLINE access mode => permanent token.
    authorize = (f"https://{shop}/admin/oauth/authorize?client_id={a.client_id}"
                 f"&scope={urllib.parse.quote(a.scopes)}"
                 f"&redirect_uri={urllib.parse.quote(REDIRECT)}"
                 f"&state={state}")

    class H(http.server.BaseHTTPRequestHandler):
        def log_message(self, *_):
            pass
        def do_GET(self):
            q = urllib.parse.parse_qs(urllib.parse.urlparse(self.path).query)
            if "code" not in q:
                self.send_response(400); self.end_headers(); return
            if q.get("state", [""])[0] != state:
                holder["err"] = "state mismatch (possible CSRF) - aborting"
                self.send_response(400); self.end_headers(); return
            holder["code"] = q["code"][0]
            self.send_response(200); self.send_header("Content-Type", "text/html"); self.end_headers()
            self.wfile.write(b"<h2>Auth OK - you can close this tab and return to the terminal.</h2>")
            threading.Thread(target=self.server.shutdown).start()

    srv = http.server.HTTPServer(("127.0.0.1", PORT), H)
    print(f"Opening the browser to authorize on {shop} ...")
    print(f"If it does not open, paste this URL into your browser:
{authorize}
")
    webbrowser.open(authorize)
    srv.serve_forever()  # blocks until the callback is received

    if "code" not in holder:
        print("No auth code received:", holder.get("err", "(cancelled)")); sys.exit(1)

    body = urllib.parse.urlencode({
        "client_id": a.client_id, "client_secret": a.client_secret, "code": holder["code"],
    }).encode()
    req = urllib.request.Request(f"https://{shop}/admin/oauth/access_token", data=body)
    resp = json.load(urllib.request.urlopen(req, timeout=30))

    token = resp.get("access_token", "")
    print("
=== AUTH SUCCESS ===")
    print(f"  store : {shop}")
    print(f"  scope : {resp.get('scope')}")
    print(f"  token : {token}")
    if "expires_in" in resp:
        print("  WARNING: this token expires - you requested an ONLINE token. Re-run for offline.")
    else:
        print("  offline token (no expiry) - paste it into your .env, e.g.  SHOPIFY_TOKEN_STOREA=" + (token[:12] + "..." if token else ""))

if __name__ == "__main__":
    main()
Run it with your store domain, Client ID, and Client Secret:
python shopify_oauth_token.py --shop your-store.myshopify.com --client-id XXX --client-secret YYYStep 5: Approve, and you have your token
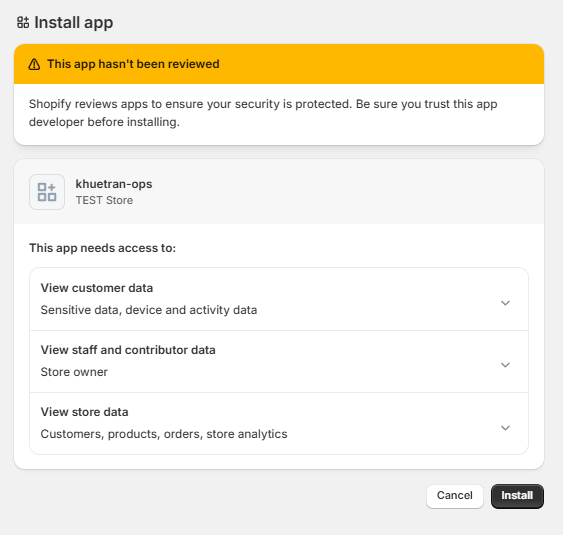
The browser opens Shopify’s install screen. Approve it.
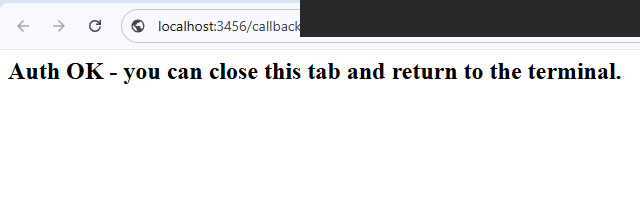
The tab lands on a local success page, and the terminal prints your offline access token (shpat_...). It has no expiry. Paste it into your config or .env, and Claude can reach that store.
One warning that matters: take the offline token, not the online one. The online token (and the client-credentials token) expires in about 24 hours, which makes your config go stale every day. The script above requests offline by default, so the token you get is permanent.
Why I use this over the connector: with several stores, the connector makes you switch the active store constantly. With one token per store in my config, I just say “using store A, do X” and it goes. That is the difference that matters at multi-store scale.
Verify it works with one prompt
Open Claude (Desktop for Path A, Claude Code for Path B). Paste this prompt:
Using my Shopify store, list the 5 most recently created products. Show the title, price, and inventory quantity for each.
If the wiring is correct, Claude returns a clean table of 5 products from your live store. If you see “I do not have Shopify access” or an authorization error, jump to the “Errors” section below.
5 prompts I run on my stores every week
This is where the workflow pays off. These are not “show me a dashboard” prompts. They are ops decisions you would otherwise make in 4 browser tabs and a spreadsheet.
1. “Show me products with low stock and recent sales velocity”
Pull all products with current inventory below 10 units. For each, show the number of orders containing that product in the last 30 days. Sort by orders descending. I want to know what to reorder first.
Output: a ranked list of restock priorities, not just a low-stock report. This is the difference between data and decision.
2. “Audit collection pages with no description or no products”
List all collections that have either an empty body_html field or zero products assigned. Format as a table with the collection title and which problem applies.
I caught 12 broken collections on one store doing this in 30 seconds. Collections with no products are dead pages in search, and Google penalizes them over time.
3. “Find duplicate products by title fuzzy match”
Pull all active products. Group titles that are ≥80% similar by token overlap. Show me clusters of 2 or more.
This finds variants accidentally listed as separate products, a common mess on stores that ran imports from multiple sources. The Shopify admin UI does not show this. Claude can.
4. “Which orders had high refund value last month and what was the most common reason”
Pull orders from the last 30 days with refund amount above $50. Show order number, refund amount, refund reason if recorded. Then summarize the top 3 reasons by frequency.
This is a customer service signal you would otherwise dig out of Shopify’s refunds export plus a CSV scrub. Claude does it in one turn.
5. “Compare conversion rate of products with vs without descriptions over 200 words”
For each active product, calculate word count of body_html, then bucket as short (under 200 words) or long. Compare orders-per-1000-views (approximation: orders ÷ products of similar age × 1000) between the two buckets.
This is a directional analysis, not a perfect controlled test, but it surfaces the “do my long descriptions actually convert better” question with real numbers.
5 errors I hit so you can skip them
Error 1: Path A connector authorization screen never returns me to Claude
Cause: Browser blocked the popup or you signed into the wrong Shopify account. Fix: confirm the Shopify admin tab is your target store, retry the Connect button, allow popups for claude.ai. The redirect back to Claude Desktop happens automatically when authorization completes.
Error 2: Path B install command errors with “claude: command not found”
Cause: Claude Code is not installed or not on your PATH. Run which claude (macOS/Linux) or where claude (Windows). If empty, install from the official docs.
Error 3: Path B MCP server hangs on first run
Cause: npx -y is downloading the @shopify/dev-mcp package the first time. On a slow connection this can take 60-120 seconds. Wait it out. Subsequent runs are instant because the package is cached locally.
Error 4: Claude returns “I cannot access that data” even though the connector is active
Cause: You declined or never granted the scope that entity needs. Path A: revisit the connector authorization page in Claude Desktop and re-approve with broader access. Path B: rerun shopify auth login and confirm the Partner account has scope access to the target store.
Error 5: I get answers but the numbers feel off
Cause: Claude returned partial data because the query hit a pagination cap. Shopify GraphQL pages return 250 records at a time. For “every order this year” type questions, narrow by month or filter by status, then ask Claude to aggregate. Mention in your prompt: “paginate through all results before summarizing.”
Bonus: schedule 5 ops routines with Claude Code Routines
Once the connector is live, the highest-impact move is to stop running these prompts ad hoc and let Claude run them on a schedule. Anthropic shipped a feature called Routines on April 14, 2026 (currently in research preview) that does exactly this. It is included on Pro, Max, Team, and Enterprise plans.
What Routines are, briefly
A routine is a saved Claude Code configuration: a prompt, optionally one or more GitHub repositories, and the connectors you want it to use. Routines run on Anthropic-managed cloud infrastructure, so they keep running when your laptop is closed. Three trigger types are supported:
- Schedule, hourly, daily, weekdays, weekly, or a one-off at a specific timestamp. Minimum interval is 1 hour. Custom cron via
/schedule update. - API, a per-routine HTTPS endpoint you can POST to with a bearer token. Wire it to your monitoring tool, deploy pipeline, or any system that emits a webhook.
- GitHub event, pull request opened/merged/labeled, release published, with filters by branch, author, labels, etc.
Create routines from claude.ai/code/routines, from the Routines tab in Claude Desktop’s sidebar, or with /schedule in the CLI. All three surfaces sync to the same cloud account. Source: Anthropic Routines docs.
Important: the connectors a routine can use are the ones connected on your claude.ai account (claude.ai/customize/connectors), not local MCP servers added via claude mcp add on your machine. If you set up Shopify via Path A, your routines can already see it. If you set up via Path B only, you also need to add the Shopify connector to your claude.ai account for routines to reach it.
Below are 5 routines I run for store operators. Times are local. Drop them into the New routine form, attach the Shopify connector, set the schedule, and forget about them.
Routine 1: Daily sales pulse, schedule “daily at 8 AM”
Using my Shopify store, compare yesterday’s gross sales, order count, and AOV against the 7-day rolling average. Flag any metric that moved more than 15% in either direction. Reply with only the 3 most material deltas in plain text. If no metric moved more than 15%, reply with one sentence confirming the day was normal.
Why daily: catches a tracking break, a viral SKU, or a Friday discount surprise before it compounds across a week.
Routine 2: Out-of-stock watchlist, schedule “hourly” (or “every 4 hours” via custom cron)
Using my Shopify store, list products currently at zero inventory that had at least 5 unit sales in the last 14 days. Group by vendor. Skip products tagged ‘discontinued’. Reply with the list grouped, or one sentence if nothing matches.
Why intraday: a bestseller selling out at 2 PM and not getting flagged until next morning is a full afternoon of lost revenue. If hourly is too noisy for your store, raise the interval via /schedule update.
Routine 3: Slow-mover inventory, schedule “weekly on Monday”
Using my Shopify store, show products with inventory greater than 50 units and zero sales in the last 30 days. Sort by inventory value descending. Reply with a table I can act on for discount, bundle, or kill decisions.
Why weekly: slow movers eat cash. A weekly review keeps the catalog honest without becoming noise.
Routine 4: Open ticket aging, schedule “daily at 5 PM”
Using my Shopify store, pull orders from the last 30 days that have notes or tags indicating an open customer issue. Show only those unresolved for more than 48 hours, with customer email and order value. Sort by order value descending.
Why daily: a $400 customer waiting 3 days for a reply is a refund risk and a 1-star review risk. Prioritize by value, not by inbox order.
Routine 5: Refund anomaly check, schedule “daily at 9 AM”
Using my Shopify store, calculate yesterday’s refund rate (refund count ÷ order count) and compare to the 30-day average. If yesterday exceeds the average by more than 2x, list the refunded orders and group by refund reason. Otherwise, reply with one sentence confirming the rate is normal.
Why daily: refund spikes mean a product defect, a shipping problem, or a fraud wave. Catching it on day 1 saves a 7-day cleanup.
You do not need all five. Start with Routine 1 (sales pulse) since it is the broadest signal. Add the others one at a time as you trust the prompts. Routines runs are subject to a daily run cap on your plan; one-off runs do not count against the cap. See claude.ai/settings/usage for your current allowance.
If you do not have Routines (Free plan, or admin-disabled in your org), you can still pull these prompts manually each morning, or wire them into a local cron job that pipes into Claude Code. The prompts themselves work in any setup.
What you can’t do (honest limits)
I want to be straight about this so you do not buy into AI hype:
- This does not write code into your theme. Claude can read Liquid templates if you give it read_themes scope, but pushing template changes through MCP is risky and I do not recommend it. Use the regular theme editor.
- This is not a dashboard. You ask, you get an answer in chat. Beautiful charts are not the output. The output is a decision, made faster.
- Large queries cost real tokens. Asking for “every order in 2024” pulls 12 months of data into Claude’s context. That is expensive and slow. Batch by month, narrow by filter, paginate.
- Multi-store takes a one-time setup per store. Each store needs its own token or connector entry. Once that is done (Path C makes it painless), you pick a store with a phrase in your prompt, not by clicking around. There is no magic “all my stores at once” button; you name the store you mean.
- Read-only is safer. Write scopes (
write_products,write_orders) are powerful and irreversible. A wrong prompt can update 200 products instantly. Keep read-only until you trust your prompts.
Who this is for, who it is not for
You will get a lot out of this if:
- You run a Shopify store and already use Claude (or ChatGPT) for ops thinking
- You spend more than 2 hours a week pulling reports from Shopify admin
- You want to start small (read-only queries) before scaling to automation
- You like clear answers in plain English more than building dashboards
You should skip this if:
- You have under 100 orders/month (the manual reports are still faster)
- You are looking for a no-code automation platform (try Zapier or Make instead)
- You need a polished visual dashboard for your team (try Shopify Analytics or a third-party BI tool)
- You expect AI to make ops decisions for you without review (it surfaces signals; you still call the shots)
FAQ
Which of the three paths should I pick?
One store, mostly chatting with your data: Path A (the connector). Multiple stores, or you want to script daily checks: Path C (custom app + Admin token), which is what I run because it skips the connector’s store-switching. Path B (the CLI dev tools) is mainly for inspecting the Admin GraphQL schema. Single-store operators I onboard usually start on Path A; multi-store operators are better off on Path C from the start.
Is this safe for my store?
Both Path A and Path B grant scopes you approve. The worst Claude can do is what those scopes allow. Approve read-only first, watch what Claude does for a week, then add write scopes when you trust your prompts. For Path A, you can revoke the connection any time inside Claude Desktop’s connector settings or in Shopify admin under installed apps. For Path B, removing the MCP entry from your config kills access instantly.
How much does this cost to run?
Path A uses your Claude.ai subscription (Pro, Max, Team, or Enterprise) and counts against your monthly message limit. Path B uses Claude Code billed per token by Anthropic. A typical operator query (one of the 5 above) uses 5-15k tokens including Claude’s response. At current pricing that is fractions of a cent per query. I spend under $20 per month on Claude API across my stores.
Does this work with multiple stores?
Yes, and it is the main reason I use Path C. Path A: authorize each store in the connector picker and switch in the sidebar, which is fine for one or two but tedious past that. Path C: give each store its own custom-app token in your config, then say “using store A, do X” in the prompt, no switching. Running several stores is exactly what pushed me off the connector and onto tokens.
Can I use this with Shopify Plus or just standard plans?
Standard, Advanced, and Plus all work. Custom apps are available on every paid plan. The Admin GraphQL API endpoints behave the same across plan tiers.
What about writing back to Shopify (update products, tag orders)?
You can, after you approve write access for the connector. Path A: on the connector authorization screen, approve the data access tier that includes the write tools you need. Path B: ensure the Partner account has the write scope on the target store. Then prompts like “update product X tag to include ‘restocked'” work. I do this only for batch tag updates and inventory adjustments, and only after testing on a single product first. Mass-update with care.
Routines is labeled “research preview”, is it safe to rely on?
Anthropic shipped Routines on April 14, 2026 in research preview. Behavior, limits, and the API surface may change. For ops routines that fire daily and only report data back to you, the risk is low: if a routine breaks, you notice the next morning and re-create it. For routines that write back to Shopify or take destructive action, I would wait for general availability or pair every write with a manual review checkpoint. Source: Anthropic Routines documentation.
Is this the same as Shopify Sidekick?
No. Shopify Sidekick is Shopify’s own AI assistant embedded in the admin. It is good for in-admin chat but locked to Shopify’s product. The MCP route gives you Claude (or any MCP-capable AI) with full Admin API reach, and you control the prompts, the scopes, and the data flow. They serve different use cases.
Related, the same operator-audit approach on the paid side: the 4 money leaks I found auditing my own Google Ads.
I wire this up for operators
If you read this and thought “great idea, but I do not have 30 minutes to fight with config files and tokens”, I do this as a paid service. I come in, set up Claude + Shopify MCP on your machine, run a verify session with you, and leave you with 10 starter prompts tailored to your store.
Email [email protected] with your Shopify domain and the data questions you wish you could ask in plain English. First five operators I work with get the setup session free. After that it is $300 flat (one-time, includes a 30-minute Loom walkthrough of the 10 prompts).